Sunday, January 15, 2012

Grilled Cheese Dippers with Tomato Soup


For Kelly's and Alyssa's birthday celebration I decided to make a snack that I discovered on Pinterest one day - Grilled Cheese Dippers! Seems easy enough right? Uhh the execution was ROUGH and aesthetically they didn't look like the pin above, BUT all the taste was there I promise. 


What you'll need: 


Bread - I used white, but wheat is fine too
Tomato soup! (To Dip In)
Buttah! Any kind. 
AND CHEESE! I used American cheese slices. I forgot to take a picture of the cheese again, whoops!

Directions for the Tomato Soup:

1. It's pretty simple. Open the cans, dump into a pot, and boil. I added basil and oregano for flavor, and it came out GREAT. Also, try not to add any water, I only added a tad bit. The thicker the soup the more delicious it is for dipping!

Directions for the Grilled Cheese dippers:

1. Cut the crusts off the slices of bread. DON'T WASTE THEM! I put them in a ziploc bag and am saving them for croutons or bread pudding (in a future blogpost). Using a rolling pin, lightly flaten the bread pieces


2.  On your newly sliced and flatened bread squares, add a slice of American cheese on top and roll
  

3. Add some butter into the pan and carefully place the rolls in - with the open seam down first. If you don't cook the seam down first you're going to make a mess, you need to seal that FIRST. Don't try to put too many in at once, I found out real quick how messy that got with all the cheese dripping everywhere. 


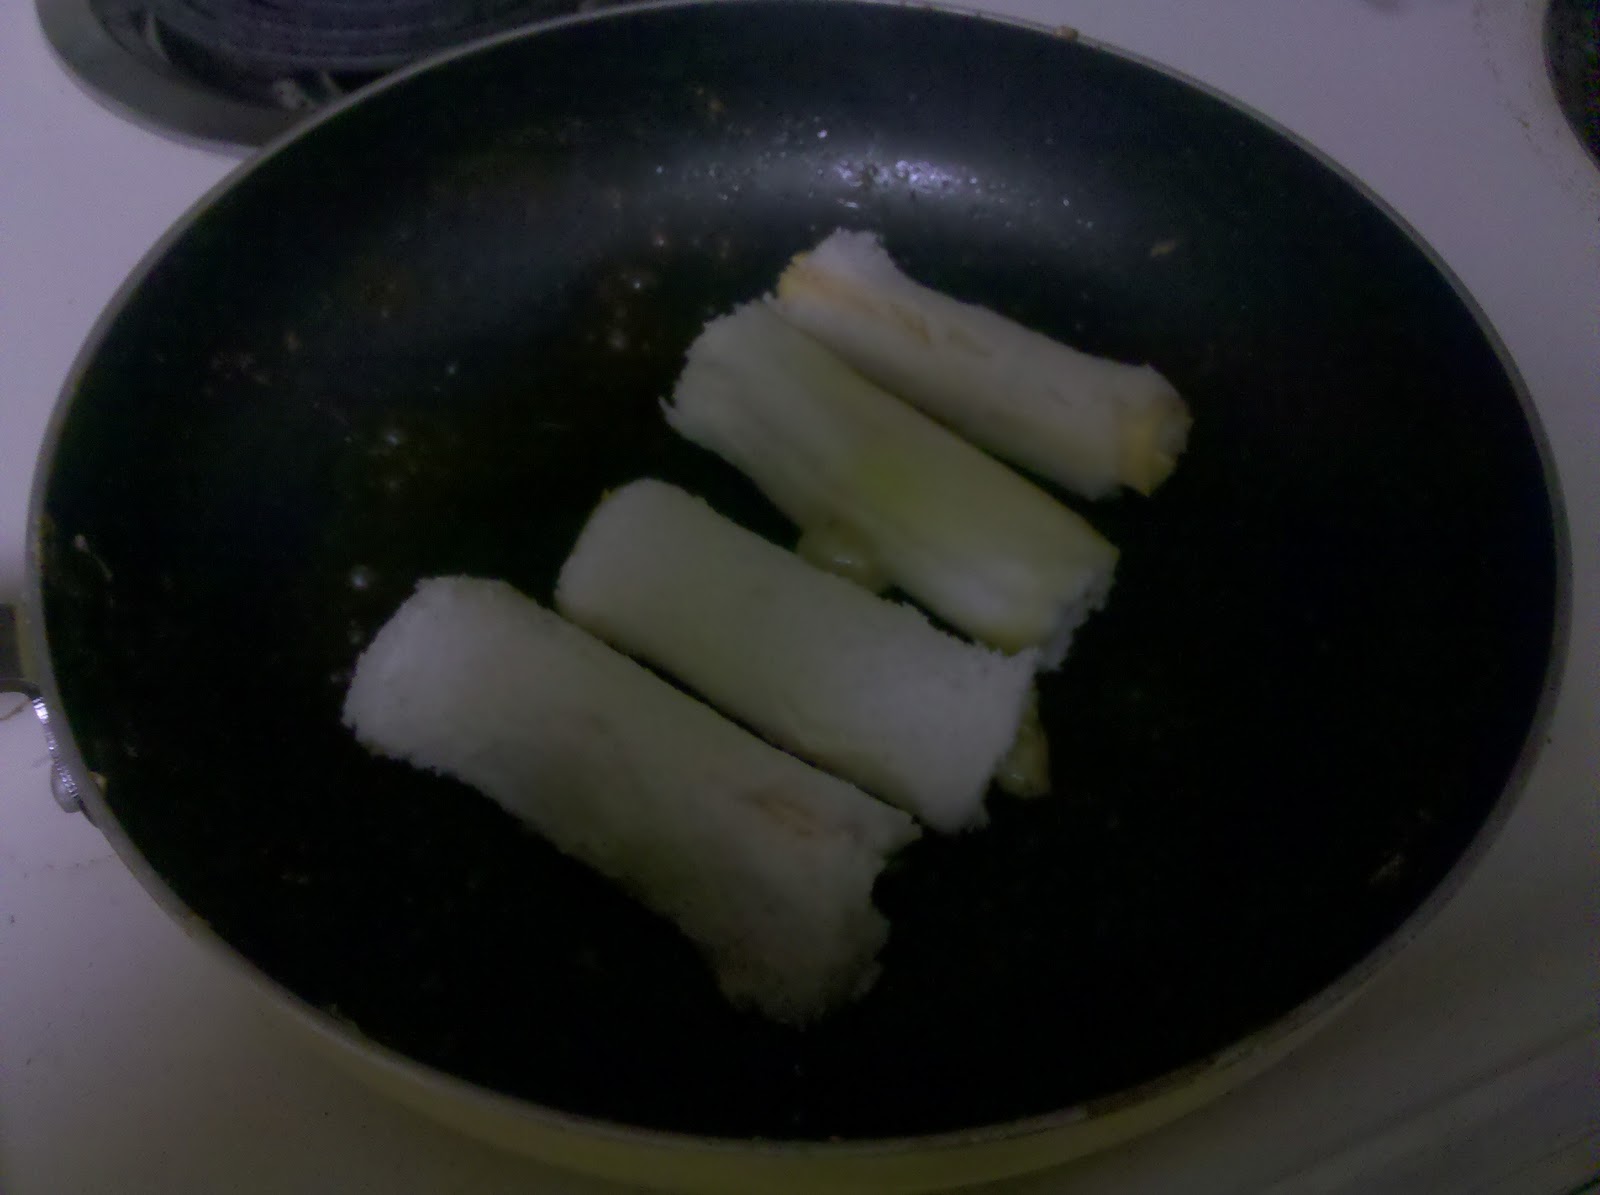
In the original pin they look all nice and neatly rolled. IT'S A LIE! I don't know how they did it, but I certainly did not have as much luck. Yes, I slightly burned some but honestly I like things burnt. As I continued doing it though I got better at not burning them and not letting the cheese get EVERYWHERE. It's all about practice y'all. 

Like my mom always says: "It's not burnt, it's just CRISPY"


 4. Repeat steps 2 and 3 as necessary. I bought very small plastic cups that I poured the tomato soup into and then dipped the grilled cheese into. If you're classy and fabulous like me, I'd recommend the small cups. 


5. ENJOY!


The perfect party dish! 

"JMU Cheese Tray" Mac

Original Pin: http://pinterest.com/pin/229894755948132712/


So I went to an event recently at JMU where they had ARAMARK's famous cheese and veggies trays. Unfortunately too much food was ordered and since we didn't want it all to go to waste, we took it home. This is the story of how I ended up with TWO GIANT BOWLS OF CHEESE CUBES. So what do I do?


Make "JMU Cheese Tray" Mac! 
I needed some inspiration from Pinterest for how to make homemade Mac because the last time I tried I did it wrong and failed miserably. The missing ingredient was FLOUR. I have posted the original pin at the top but honestly this is a very special rendition of mac and cheese because it's based on items I had laying around the house instead of what the recipe says. Plus, you'll see it has a Latina taste based on the crazy ingredients I used hahaha!


Ingredients:


Milk

Recipe calls for flour but I used MASA instead which is what I use to make tortillas!

You need salt, but I added Adobo and some Sazon Goya for the heck of it! 

Elbow macaroni makes most sense but I used penne for now! 

Buttah! Whatever ya want.
OH, and cheese. LOL I forgot to take a picture! I had an assortment of pepper jack, cheddar, & jalapeno cheese cubes! Thanks JMU ARAMARK!

Directions:

1. Boil pasta (Duh). I have a PASTA BOAT so I use that in the microwave, but boil it however you choose. Just boil it while you're doing the rest of the directions.

2. In a hot pan/pot add butter and MASA (or flour). How much you ask? I don't measure things! I just put whatever made sense. Like let's say 2 tbsp of MASA and like 4 tbsp of butter #PaulaDean style. WISK these together.

3. Slowly add in about uhh 2 cups of milk (?). Continue wisking until it gets thick.

4. Remove from heat and ADD CHEESE. Normally you'll use shredded cheese but since mine were cubes it was taking forever to melt so I had to get a masher. 

5. Once the cheese sauce is melted and the pasta is boiled, mix that ish together until it tastes good. (Obvs)

ENJOY! Here's my creamy, cheesy concoction below:

mmmmm cheesy and practically FREE. Best combination known to man.

Tuesday, January 3, 2012

Bacon, Egg, and Toast Cups

Original Pin: http://pinterest.com/pin/229894755948090713/

What you'll need:
Bacon (any kind)

Eggs

White OR Wheat bread will do

Butter or Margarine 

Muffin Pan, non stick is not necessary
Directions:

1. Preheat oven to 375 degrees and lightly butter the muffin pan
2. I didn't have a pin roller, so I just flattened the slices of bread with another masher thing, and I just cut the slices in half. I then put the pieces of bread lining the inside of the muffin cups like this:


3. In a pan I cooked the bacon SLIGHTLY, just before it gets crispy, so that it's not raw going into the pan. The rest of it will cook inside the oven.


4. When you're done cooking the bacon, put one piece in each of the muffin cups like so:


5. Then crack one egg inside each muffin cup (plus add some salt and pepper) on top of the bacon like this:


6. Place the pan in the oven for about 20-25 minutes, or until the eggs have cooked to your liking. 
7. Take them out and ENJOY!

Completed Toast Cups!!!

My brother Erick really enjoyed them!